ratings-display.rating-aria-label(1)
Feb 27


In this guide, we'll walk through setting up a local AI-powered browser automation agent using browser-use, playwright, and gradio. By the end, you'll have a web-based UI running on your machine, ready for automation tasks.
Prerequisites
Before starting, ensure you have the following installed:
Python 3.13 (or install it from https://www.python.org/downloads/)
Git
Step 1: Install Required Dependencies
We'll start by installing the required Python package and Playwright.
siddhesh.kadam@SIDDHESHs-MacBook-Air ~ % pip3.13 install browser-use
siddhesh.kadam@SIDDHESHs-MacBook-Air ~ % playwright install
Step 2: Set Up a Project Directory
Create a new project directory and navigate into it:
siddhesh.kadam@SIDDHESHs-MacBook-Air ~ % mkdir ai-agent
siddhesh.kadam@SIDDHESHs-MacBook-Air ~ % cd ai-agent
Step 3: Clone the Web UI Repository
Clone the web-ui repository from GitHub, which contains the UI components for our browser automation tool.
siddhesh.kadam@SIDDHESHs-MacBook-Air ai-agent % git clone https://github.com/browser-use/web-ui.git
siddhesh.kadam@SIDDHESHs-MacBook-Air ai-agent % cd web-ui
Step 4: Set Up a Virtual Environment
To keep dependencies isolated, create and activate a virtual environment:
siddhesh.kadam@SIDDHESHs-MacBook-Air web-ui % python3.13 -m venv .venv
siddhesh.kadam@SIDDHESHs-MacBook-Air web-ui % source .venv/bin/activate
Step 5: Install Dependencies
Now, install the required Python packages listed in requirements.txt:
(.venv) siddhesh.kadam@SIDDHESHs-MacBook-Air web-ui % cat requirements.txt
browser-use==0.1.37
pyperclip==1.9.0
gradio==5.10.0
json-repair
langchain-mistralai==0.2.4
(.venv) siddhesh.kadam@SIDDHESHs-MacBook-Air web-ui % pip3.13 install -r requirements.txt
This installs browser-use, pyperclip, gradio, json-repair, and langchain-mistralai.
Step 6: Run the Web UI
With everything set up, start the web UI by running:
(.venv) siddhesh.kadam@SIDDHESHs-MacBook-Air web-ui % python3.13 webui.py --ip 127.0.0.1 --port 7788If everything works correctly, you should see output similar to this:
INFO [browser_use] BrowserUse logging setup complete with level info
INFO [root] Anonymized telemetry enabled. See https://docs.browser-use.com/development/telemetry for more information.
* Running on local URL: http://127.0.0.1:7788
Now, open your browser and visit http://127.0.0.1:7788 to interact with your AI-powered automation tool!

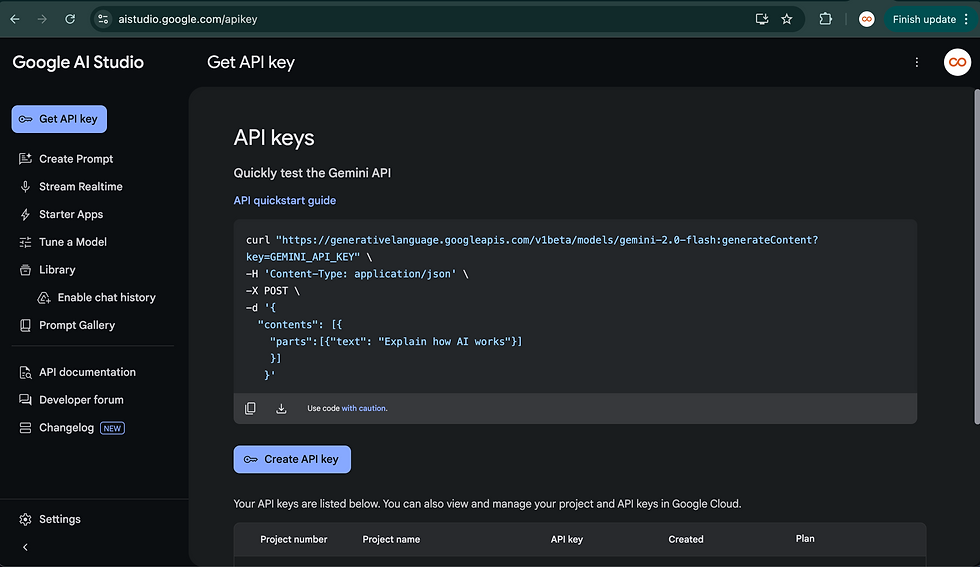
Step 7: Create Google AI Studio API Key
LLM configuration in Google AI Studio helps a website or app use AI for things like chatbots, smart search, and content generation. It connects to AI models, customizes responses, and ensures smooth and secure performance. To integrate with Google AI Studio, follow these steps:
Go to Google AI Studio

Click on Get API Key
Click on Create API Key
Select My First Project
Click on Generate Key and copy the key

Step 8: Setup LLM Configuration
Configure the AI agent to use Google AI Studio by setting up the API key in the relevant configuration file.

Step 9: Define a Task
Navigate to the Run Agent section.
Define a task you want the AI agent to execute.
Run the agent and monitor the results.

Step 10: Run the Agent and See the Result
Conclusion
With these steps, you've successfully set up a local AI-powered automation agent. This setup is useful for automating browser interactions, testing web applications, or integrating AI models into a web-based UI. Feel free to experiment and extend its functionality!
1 Comment